I love at-home treatments for 2 reasons: they save a lot of time and they are far more affordable than spa visits. If done properly and regularly, you can see some really great results and make beauty products you do splurge on work even better. Today I’m going to talk about micro needling and how it can improve the texture of your skin, helping with blemishes, acne scars and fine lines. If the thought of rolling needles into your face sounds too scary for you, take a deep breath and don’t let it discourage you from reading! Because at the end of the day, it’s SO worth it!
What is it and how does it work?
Micro needling is the procedure of punching hundreds of tiny holes in your face, causing microscopic injury to the skin, which in turn kick-starts your skin’s natural healing process and collagen growth. More collagen, better skin – that simple. The idea is that you are basically tricking your skin into thinking that it has been wounded, but as a result, you’re thickening the skin and improving the texture and the appearance of blemishes, acne scars, discoloration with this treatment. Micro needling also helps with better penetration of products, thanks to tiny pinpricks that work almost like micro canals, allowing your products like serums to reach deeper into the skin.
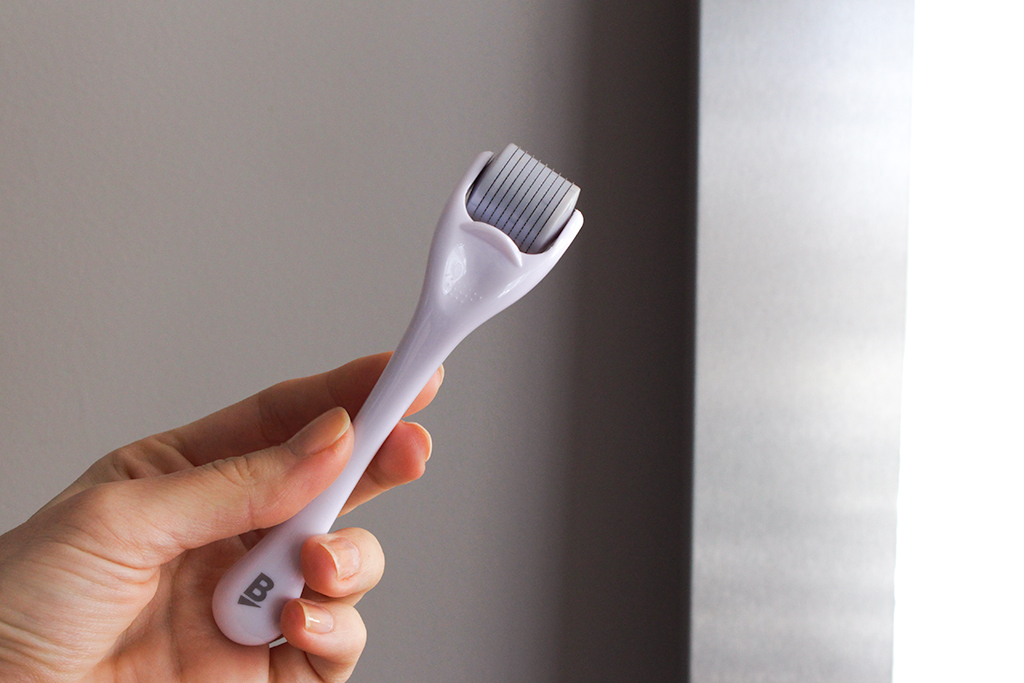
As you can see from the photo above, micro needling is done with a tool called derma roller that resembles a super small paint roller, except that the roller is pricked with tons of small, sharp needles. The needles come in sizes between 0.2 and 1mm depending on the roller but you would be better off starting with short needles as the longer ones could be pretty spiky on the skin. The procedure isn’t painful at all if you use shorter needles as well.
You can easily order a derma roller from Amazon if I already convinced you to try it 🙂
How to use it?
There is a specific technique to micro needling. First, disinfect the tool with alcohol and cleanse your face before rolling. You should gently roll the derma roller around 5 to 10 times vertically, horizontally, and diagonally over each side of the face while using mild, even pressure. Be sure to lift up the derma roller when changing directions to avoid scarring. Apply serum, roll, and apply more serum. The sensation may be strange at first but never unpleasant. Never use the roller over active breakouts as you can spread the bacteria over your face and aggravate the breakout even more. You should do this treatment once every 2 weeks and replace the roller after a few uses because the needles are not so sharp any more and to prevent bacteria from building up on it. Also remember to clean and spray you roller with alcohol in between uses.
I like to prep my skin after cleansing with a super gentle exfoliating mask to get rid of dead cells and maximize the efficacy of the procedure.
Banish recently gifted me their Starter Kit which includes a small derma roller and other products to maximize the treatment so I decided to do a short demo tutorial for you on how I use the regimen.
As with everything, consistency is key so you need to use the regimen for at least 6 months (especially if you have deep acne scars or discoloration) to see a more dramatic difference in your skin but your skin should start to look way better after about 2 months of consistent use. However, you should see improvement in skin hydration almost immediately.
I hope you enjoyed reading this blog post and that you learned something new. Let me know if you decide to give this treatment a try!
Xoxo,
Kat


4 Comments
Kat, this tools seems very interesting and is my first time hearing about it. I do suffer from some blemishes and acne scars that could potentially see a benefit from using this product. Thank you for a detailed and great review!!
Lily | https://lmastr0819.wordpress.com
Hi Lily,
Yes, it’s a pretty good stuff so definitely keep me posted if you give it a try! Thank you so much for stopping by!
Xoxo,
Kat
Hi Kat,
Micro-needling looked so easy and harmless. But will your face have like the “Purge” stage, like what happens if you use one of those electronic cleanser brushes? Thanks for sharing!
Hi Jenny!
Thanks for stopping by my blog! It all depends on what size of needles you use. If your roller comes with short needles, the “purge” stage is minimal and depending on how your skin behaves, you should be able to use the electronic brush cleanser after 24 hours. If you use longer needles, it can take up to a few days for your skin to heal. It’s all about monitoring your face and checking how it reacts so I would suggest doing a short test on one side of your cheek and run the cleanser and see if there is any reaction. I hope this helps. Best!